Tuesday 25 August 2015

Homemade confetti tutorial

I love a wedding.

I have had the pleasure of being involved in many weddings this year through the handcrafted bespoke gifts in my Etsy shop.

Some have been made for strangers who have found my personalised items though Google or Etsy searches and some have been for friends of friends. I like this type of order as I get to hear some of the feedback.

Last week I made two frames for a colleague and after returning from one of the weddings this week he volunteered the following feedback from the groom: "Mate, I f***ing love what you gave me, it's brilliant. Better than all the other c**p we got!".

I think roughly translated that means he liked it! Praise indeed.

I think whenever you give a wedding gift it should show the couple how much you care about them. It should be something that's chosen with love, and if it's handmade with a personal touch, specifically for the happy couple, then even better.

I've been to one wedding this summer and of course, I made a map frame for the bride and groom, with a map showing the location of the church and reception venue. But with by brain on 'handmade' overdrive I started thinking about other ways I could bring something individual, made with love and care, to this special day.

I am also incapable of throwing anything away, so this project was just perfect. I was recently ill and off work and my colleagues sent a huge bunch of gorgeous peonies and roses. I was really disappointed when they started to go over, past their best but just in time I found inspiration to make something with them. We also had a few rain damaged roses which, once they'd spent a day in the sunshine drying out, were ideal for this project.  Never again will I think in despair "what can I do with dying flowers?".

An added advantage of this wonderful confetti - as if it could't get any better - is that it is completely biodegradable.

I am off to a wedding again on Friday and my homemade confetti will be coming with me!

Homemade confetti tutorial 


Step 1 - Choose your flowers. I use roses and peonies as the petals seem to dry to a nice crisp finish and they don't take too long. I tried it with purple Lisianthus but the petals were just too waxy and they didn't dry out at all. Even if your blooms are on the turn, they'll still be fine for homemade confetti, as long as they haven't completely shrivelled up.


Step 2 - Line a few baking trays or cardboard boxes / lids with kitchen roll. Gently remove the petals one by one from the flower head. Lay out each petal on the kitchen towel making sure that the petals do not touch. If they do they will dry together. It will take up quite a bit of kitchen roll to keep them spaced out properly but they can be condensed in the next step.


Step 3 - Leave the petals to dry in a cool and shady place, away from direct sunlight. After a couple of days, the petals will have started to dry out and will have reduced in size. At this stage you can condense down the number of trays you need as the petals can be moved closer together. Repeat this step every four or five days. As you remove the kitchen towel you can fold it and keep it for the next confetti project. Waste not, want not! 


Step 4 - Once the petals have completely dried - around three weeks - they can be gathered up and stored. I have kept some in jars and some in paper bags. If you use jars, leave the lid off or make sure it isn't sealed as this can make the petals soften again and sometimes they will start to smell. I took my confetti to the wedding in a handmade paper bag by following this tutorial by Hello Sandwich. I omitted the handles and instead folded the top over and secured with washi tape.  


Saturday 22 August 2015

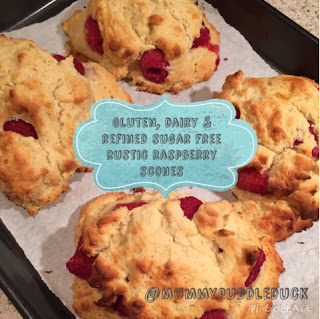
Gluten, dairy and refined sugar free raspberry scones


Gluten and dairy free scones
Following both a gluten and dairy free diet is most challenging at breakfast time. I usually alternate between a bowl of gluten free cornflakes with Doves Farm bran flakes topped with rice milk, and peanut butter on gluten-free toast. But I've recently stumbled upon a revolutionary recipe to brighten up breakfast.


It can be whipped up in minutes and is deliciously satisfying. I urge you to try it.

The inspiration for this bake came from the raspberry scones that used to be available in Starbucks.

Gluten and dairy free scones
Add caption
Picture the scene if you will:
It's 6 am. I am in the hallway trying (and failing) to fumble in the depths of my handbag for the car keys in silence so as not to wake the children.
Ahead of me is a 200 mile journey and a 9am meeting.
It's raining.
It's cold.
It's dark.
And so is my mood.

But as I locate the keys and venture over the threshold, the realisation hits that my journey will include a stint on the M6 south, past the unremarkable Corley Services. But that can mean only one thing; a humungous raspberry scone washed down with a skinny flat white for breakfast.

Pure joy.

Gluten and dairy free sconesThat was in my pre-dairy and gluten free days, when ingredients did not need to be scrutinised and I didn't need to pack three meals and snacks into a picnic bag the night before a meeting. It's so hard to eat on the go with my combination of dietary requirements but that's a blog post for another day!

The memory of the raspberry scone lives on and I wanted to recreate my own version that I'd feel happier eating, without the side helping of guilt.

I found the basic recipe on the first page of Google. It's from the head chef at The Whitehall Hotel in Bournemouth. It's easy to follow and contains few ingredients so even without modification it's a winner.

However it's still not dairy free and where possible, I try to remove refined sugar from my baking and replace it with an alternative. I sometimes use honey - which I know is still high sugar but the benefits of using a local honey, which can help combat hay fever, outweigh the naughtiness of the sugar rush in my opinion.

I'm using Sweet Freedom at the moment in recipes and I couldn't be happier with it. It takes a bit of calculating as you need to use 25% less by weight but it comes in a squeezy bottle which is really easy to use.

Let me know how you get on. Happy baking.

Gluten and dairy free scones


This recipe makes four huge rustic scones.
I have a big appetite and need a filling breakfast so feel free to make more smaller scones if you prefer. I find that the raspberries tend to soften very quickly so if you're not going to eat these within a couple of days, freeze them. I freeze them individually and just take one out the night before I'll be having them for breakfast.

- 250 g gluten free self raising flour blend - Dove's Farm is my go-to
- 1 level teaspoon gluten-free baking powder - the Waitrose Ingredients product fits the bill
- 50 g dairy free spread - I use Pure and these have been entered into the Pure #bakedairyfree competition.
- 37g Sweet Freedom Original
- 1 large egg
- 150ml milk alternative - I use Rude Health brown rice drink
- 24 raspberries or two handfuls of frozen raspberries

Line a baking sheet with parchment or a silicone sheet
Pre-heat oven to gas mark 7 / 220 C / 200 C (fan)

Weigh flour and add baking powder. Rub in the pure spread like you would a crumble mixture to make a fine breadcrumb-like texture.

In a separate bowl, lightly beat the egg and add the brown rice drink. Add most of this to the flour but reserve a few teaspoons for brushing over the scones prior to baking. Add the Sweet Freedom and mix all ingredients together.

It's a very sticky dough so won't resemble traditional scone mixture that can be rolled out. Instead spoon four 'dollops' of dough onto the baking tray reserving half of the mixture. Place six raspberries on the top of each scone before topping with the remaining mixture.

Brush the reserved egg and milk combo on top of the scones and bake for 15-18 minutes.

Serve warm fresh out of the oven or once cooled store in a cake tin for two days. Also suitable for freezing.


Wednesday 19 August 2015

IKEA recipe hack - gluten free flapjacks


I love IKEA. Pure and simple, it's a happy relationship. We only see each other every few months but when we do it's like we've never been apart.

If I started to list everything we own in this house that originated from the big blue warehouse in Wednesbury I'd lose you before the end of the paragraph. Suffice to say, the bedroom furniture I had when I was ten years old is still going strong, baby puddleduck's nursery furniture has been handed down to the boy, the playroom is Expedit'd to the rafters and Hektar takes pride of place in the living room.


I'm not sure what I enjoy most, meandering round the dream-like room sets following the arrows as if magnets are drawing me round the store, or catching five minutes on Pinterest searching for Ikea hacks to inspire organisation of the chaos in this house! (OK - honest Wednesday - I never spend just five minutes on Pinterest, I think I managed to loose just 42 once when I was having a good day and no matter how many storage units, space saving devices or ikea hacks I follow to the letter this house will never be organised!!!)

Such is my passion for Ikea, I am a Family Card member and have subscribed to the email newsletters.

Imagine my delight then when the lovely people at Ikea sent out a recipe from Izy Hossack which landed in my inbox on the very day two bananas were embarking on their final step towards the compost bin, never to be seen again.

Does anyone else manage to get through an entire bunch of bananas before at least two turn inedibly black? No? Just me? OK.


This recipe went to the top of my baking hit list at the speed of light as I have yet to find the perfect flapjack recipe, given that most contain dried fruit which I cannot stand the sight of never mind digest. I'm also a guilty convert to the current trend that is coconut oil (homemade body scrub blog post coming soon) so off to the local supermarket we trotted to buy gluten free oats and maple syrup and get this recipe started.


I've called this blog post Ikea hack as I made a few substitutions to the recipe - the shop didn't have maple syrup so we had to make to with golden syrup combined with the remnants of maple syrup I managed to dig out from the back of the baking cupboard, and I also substituted the sugar for 14g of Sweet Freedom natural fruit sugar.

The recipe is naturally dairy and gluten free so again = winner!


The presence of bananas in the recipe was also timely given that our banana tree has fruited this year. I think that's quite rare. Cue arty photograph of banana and oat flapjacks in foreground with fruiting banana plant in the background.


ORIGINAL RECIPE BY IZY HOSSACK - topwithcinnamon.com/ for Ikea

90g coconut oil
2 mashed over-ripe bananas
120ml maple syrup 
2 tablespoons demorara sugar (I replaced this with 17g Sweet Freedom Original)
1 teaspoon vanilla essence
pinch of salt
240g porridge oats (gluten free)
50g dark chocolate, melted

Combine oil, syrup sugar, vanilla and salt in a saucepan and heat slowly until the coconut oil has melted. Stir in the oats and stir well to ensure they are all coated. 

Pour the mixture into a greased baking tin and flatten. Bake at 180 C / 160 C (fan) for 20 minutes. 

Drizzle with the melted chocolate. Cool and cut. Serve. Eat. Enjoy. 

Despite baking for years I've never used my silicone baking 'tin' but we'd already popped a quick batch of brownies in the oven and my other tin seemed too big for the amount of mixture. I bought this one from Denby in the sale eons ago when it was priced so low it would have been rude to leave it there on the shelf. Finally it got its first outing with this recipe. 

It was perfect for the flapjacks. No need to line or grease the tin first, the flapjacks cut really easy when still inside the tin and easing round the edges they released easily. Think I'll be trying more recipes in this!