Sunday, 8 July 2012

Soldier cupcakes

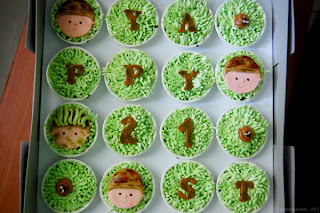
I love these little soldiers. I think they're my favourite cakes I've made so far.


The base is a basic chocolate sponge cake, and they are covered in vanilla buttercream before the final soldier cupcake topper. 


They were really easy to make. I bought some gum tragacanth and some sugar flair colouring in paprika / flesh especially for the little faces. It was the first time I'd added gum tragacanth, inspired by the wonderful Victorious Cupcakes (via www.goodtoknow.co.uk) and I do think it made them a little more sturdy than the cupcake toppers I have made before. However, the shop bought sugarpaste I was using (Renshaws) already contained gum tragacanth in the ingredients. 


I added the gum tragacanth to the icing the night before rolling and cutting the icing and assembling the soldier cupcake toppers.

The brown, black and green took quite a bit of colour to get the dark shade I was looking for using sugarflair gels, so I was quite generous with the paprika / flesh too and it turned out to be far too intense so I had to add twice as much white icing to it and knead it all together. I've stored the remainder in a plastic bag in an airtight container so I have plenty for the next project. 

I added the gum tragacanth after the colour. I don't know if that's the right way but I read it on another blog, sorry I cannot remember which one. 


The first stage was cutting the circles out for the face and rolling the little ears and noses. I stuck them on using gin but have made a note to myself to invest in some edible glue. I'm such a cheapskate!

I gave them all a little smile using an icing nozzle before using the same circle cutter for the hats from the same icing as the camouflage cupcakes. I then cut thin strips out of green icing for the brim of the hats. 


Last thing I added eyes and tried to give each one a little character of his own. A few even got a bit of camouflage paint in the form of sugarflair's green powder dabbed on with a cotton bud.


The cute little soldier cupcake toppers were left overnight and added on to the buttercream swirls on top of the cupcakes before taking them to the party. I remembered too not to put the lid on the cake tin so the cupcakes don't sweat. This can lead to the cases coming away from the cake and ruining the whole effect. I did leave one box of cakes in the kitchen whilst cooking and they did start to peel so I will definitely remember to leave them in a cooler place next time before they get transported to their final party destination.

Related posts: Military (Army( Cake and Camouflage cupcakes

Camouflage cupcakes
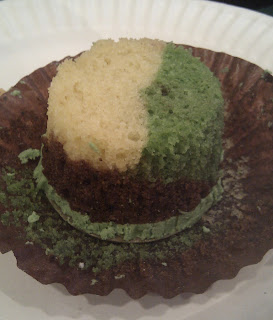
For the army themed party I created camouflage cakes where both the sponge and the topping were created in a camouflage design.


The sponge itself was created by splitting a four egg sponge cake mixture into thirds. One third I left plain, the second batch I added two tablespoons of cocoa and the last batch I added some green food colouring.

I then added a scoop of each colour into a cupcake case and baked as normal. This created a nice surprise when people ate the cakes. I've turned the cake upside down to take a picture of it so you can see the three different colours easily. 

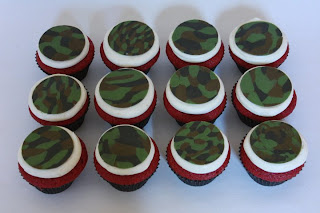
They were then topped with camouflage icing made using a mixture of black, brown and green icing rolled out and cut into circles for the top of the cakes. They can be seen below on the bottom row. I topped them with red '18's.


The tent on the cake was made from the same camouflage mixture and topped with the camouflage icing. Here it is 'naked' below along with a couple of the cupcakes.


Related post: Army cake
Related post: Soldier cupcakes

Military cakes

Attention! By the left, eat cake!

The military cake project turned out to be great fun. Here's the resulting cakes, taking pride of place at the birthday bash.


The main cake was designed by my other half and he made the soldier and the rifle. I think he had fun and it was lovely to sit down as a family and make the toppings for our cakes. Even baby puddle duck got involved!

The cake itself is Victoria sponge covered in a crumb coating, before being topped with icing using the grass nozzle (still my favourite).

The tent is a cake cooked in a small loaf tin, frozen, trimmed to shape before a crumb coating. I then created a camouflage design by rolling out green icing leaving it quite thick, placing black and brown patches of icing on top and then rolling the whole thing out again. I put a square triangle of black icing at the front and back of the tent and when the camouflage icing was draped over the tent shape, I created a little 'door' at the front and trimmed the excess 'canvas'.


I then placed the tent on top of the cake and added the grass. (Please ignore the messy work station in pic above - as posted before I have the tiniest kitchen in the world and end up working on top of myself most of the time!)

The cake looked a bit bare at this stage, so I used some of the sponge that I had trimmed from the tent shape cake and created little mounds on the cake board which I then covered in a crumb coating and iced grass on top. I also iced a little grass for the rifle to sit on as it got a little bit lost on the cake board which had been covered in chocolate icing before mixing a little of the green icing in too to add texture. This was all applied pretty roughly with a spatula.

After I'd iced the cake and topped with the tent, I didn't really know where to put the soldier and his rifle and backpack. I ended up just putting him by the side of the cake / tent and giving him a little fire to keep warm. This was made from chocolate strands for the wood (fairly cheap from Morrison's) and some citrus strands for the fire.


These cupcakes are described in a separate blogpost as wanted to give them their own post they are so special!


I've also done another post on camouflage sponge cake.


Wednesday, 4 July 2012

Camouflage Army Cakes

My nephew is 18 this week and my sister in law has asked me to make his birthday cake. He's in the army so we thought a military cake theme would be nice.

I've googled a few ideas and think I will try some of these.i hope no one minds me linking to their pictures, I have stated the sources and am definitely not trying to pass off any of these amazing creations as my own (mine will not look as good as these!).

How about making the cupcake itself a camouflage cake? From http://www.my-creativeway.com/2011/06/tutorial-how-to-make-camo-cupcakes.html


 These soldier toppers are just the cutest: http://curiouscupcakes.livejournal.com/843390.html


I would love to  be good enough at cake decorating to command the £125 that http://www.thecakestore.co.uk/army-cupcake-tower/ is offering this collection at!


Add caption
I think I will make one large cake and cover with camouflage icing, some lettering that I will make from icing run outs and toy soldiers finished off with a black ribbon.

Monday, 2 July 2012

Charity bake sale

Here are some pictures from the charity bake sale last week in aid of Breastfeeding Awareness week.

Mine are the purple roses and the garden themed cakes. I had so much fun making the garden cakes for my father in law a few weeks ago and I thought they looked so cute that they may raise a bit of money for the charity.


I did flower pots, ladybirds and small flowers on top of grass buttercream icing. I just love the grass nozzle. I also tried to do the watering can run outs again, but they all cracked when I tried to remove them from the greaseproof paper. I think next time I may try cling film instead. 


In the top picture you can see my friends put more thought into their cakes than I did - they both did boobs! One friend even made two versions, chocolate flavour and vanilla flavour! Love it! 


Duck egg versus hen egg

I was making a huge batch of cakes last week for the charity cake sale and a birthday bash so I decided to do a little experiment and compare duck eggs with hen eggs. Is there any difference between cupcakes baked with hens' eggs and cupcakes baked with duck eggs?

Duck egg cupcakes versus hen egg cupcakes

I always weigh my eggs before I weigh any of the other ingredients and use the same weight of everything. For example if three eggs weigh 235g, I will use 235g of butter, 235g of sugar and 235g of flour with the eggs, before adding a generous splash of vanilla. 

The major difference initially between the duck egg and hen egg was that I only needed two duck eggs (240g) but three hen eggs (256g) to make a comparable amount of mixture. 

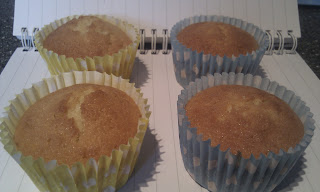
I baked a tray of hen egg cakes first before making the duck egg ones so the hen egg mixture was standing for a bit longer but for comparison I baked four hen and four duck egg cupcakes in the same tray so that the oven temperature and cooking time would be exactly the same. The results above and below show the hen eggs in yellow cases alongside duck egg blue (geddit?).

What is the difference between duck eggs and hen eggs when making cupcakes?

Visibly there is not much difference; the hen egg cupcakes rose ever so slightly more. I had weighed the mixture into each cupcake case, so that I knew they were exactly the same (35g). 

differences between cupcakes baked with hens eggs and duck eggs

Upon cutting the cupcakes in half, the hen egg cake seemed slightly lighter in colour. Taste wise, it was very difficult to notice a difference but that may be because I am very generous with my vanilla extract so perhaps that masked the difference from the eggs. 

Result: I would use duck eggs again as you need fewer eggs and the taste is just as good.

Oh no, the big 3 0

I didn't look forward to my thirtieth birthday very much - I still miss my twenties, but when my nephew turned 30 I needed something quick and simple for his cakes. I hope he didn't have issues with turning 30 as this collection pretty much screamed the big 3 0.
We held a simple family party so I made 24 cupcakes. The family has been subjected to quite a few of my cake creations so I decided that I would use my favourite vanilla cheesecake topping instead of buttercream. I also wanted the cakes to be masculine so opted for a blue and white theme.

I did royal icing run outs for the numbers and letters as I still haven't got round to buying the stensils or cutters (and hubby says we're not allowed to spend any more money until
I'm back at work after maternity leave.). I used Microsoft word to find a font that I liked and then made the words and numbers quite large, I think I chose 40
point. I then put the printed sheet underneath some baking paper and iced the letters. I did plenty as I knew some would crack as I lifted them off the sheet. I let them dry for 24 hours and then stored them in an airtight box until needed.

When I assembled the cakes I rolled out some blue and white icing and cut circles and stars for the toppers. I used gin as glue but plan to purchase some proper edible glue soon.

Although these looked great and I received compliments again, I wasn't pleased with the cream topping and white icing - I should have thought more about the colours working together. Also, because the topping cream is very wet it made the icing toppers 'bleed' slightly and slip around the top of the cupcakes when they had been out on the buffet table for an hour or two. Lesson learnt.